Art, Art Quilt, bracelets, Fiber Art, Prayer Flags (mini tute), Tutorials

Prayer Flags Flying High (and mini tutorial)

I thought for sure that I had posted about making prayer flags but not so!  Prayer flags have a long tradition and they can be seen in many different configurations.   There is no right or wrong way.  There is a blog devoted to Prayer Flags at :  ThePrayerFlagProject.blogspot.com      There you will find tutorials and many examples of how various artists have interpreted and created their own Prayer Flags.  (mine are posted in March this year 2015)

I had thought about making and hanging some flags for well over a year and was waiting to be inspired it seems 🙂   A few months ago I was walking down the aisle of a local craft shop and found a package of burlap banner shaped pieces in the clearance section.  The first thing that I thought of was that they would be perfect for Prayer Flags.  And if I messed up, then the investment was minimal.

There were four of these burlap shapes in front of me looking like this:

burlap for flagseach measured 5 1/2 ” by 7 1/2 “

The first thing that I did before anything else was to stay stitch inside all the edges of all the flags to minimize fraying.  Burlap frays. I didn’t mind that,  It enhanced the rustic look that I was trying to achieve.  But I did want to contain the amount.    I used black thread and a zig zag stitch and stitched each flag on every side about 1/4 inch in from the edge.IMG_3498

        I figured there was no hiding of the stay stitching so I incorporated it into the overall design

You are goiing to need to attach a narrow muslin muslin hanging sleeve attachedsleeve to the top.  Do that now by machine UNLESS you are going to use that top space for your hand stitching later.  In which case you will attach the sleeve as the last step with each flag.

inspire_dream

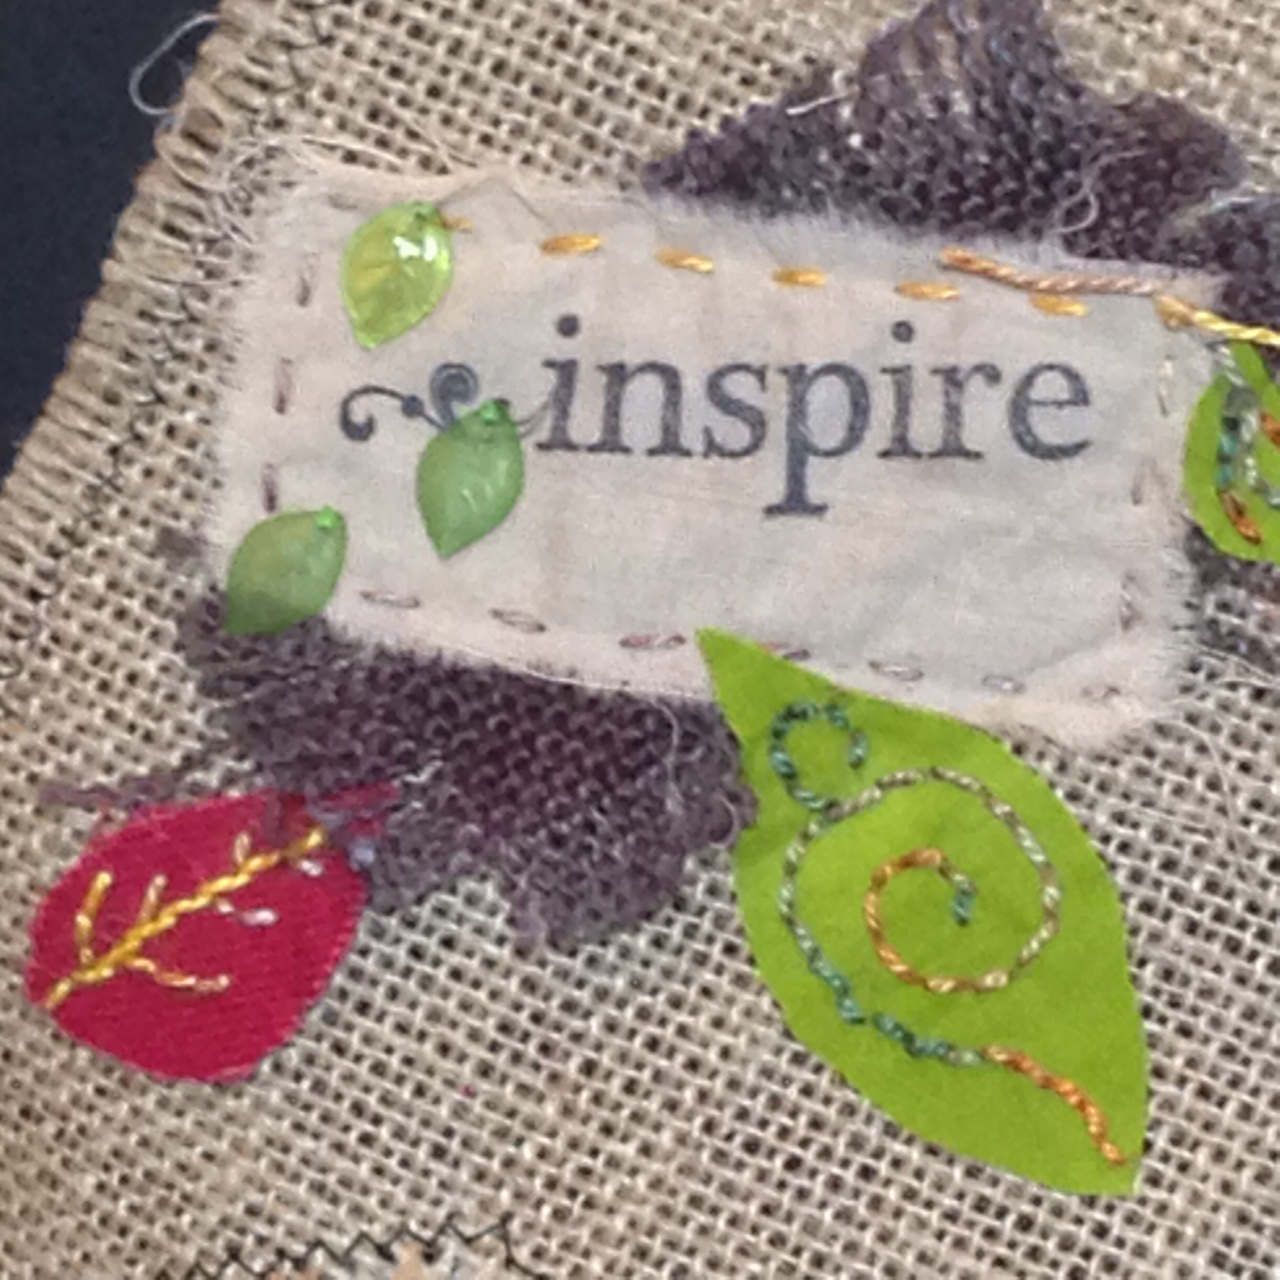
Gather your fabrics and threads and design your flags.  I used muslin for the inspirational words, and a variety of fabrics: cheesecloth, bits of organza, felt, burlap.  Use whatever your design calls for!

hope_loveI also added a few beads, some ribbon and buttons and hand stitched with embroidery cotton of various sizes.      

The final step was to string the four finished flags together by running a length of hemp through the sleeves.

Details of the Four Flags Belowdetail_hope

detail_loe

detail_inspire

detail_dream

Accessories and Ornaments, Home Dec

Paint and Bead Your Own Decorative Pillow – Back by Popular Demand

Paint and Bead Your Own Decorative Pillow

originally Posted on November 1, 2013


Back By Popular Demand

Make your own decorative pillow.  You will paint your own fabric and embellish it with stitching and beads.  The class is on the schedule at Baron’s Sewing Center in Woodland Hills for Tuesdays January 14 and January 21st 2014 
 6 pm until 9 pm 
(6 Hours total – 3 hours each day)

You can create your own design or fashion your pillow along the lines of this one that I made for this class.

P1040166

I started with a piece of white PFD Kona cotton and painted the background with an acrylic wash of color.  Next I painted the flowers and layered the piece with batting and lining.  Then the REAL fun began as I used thread painting to add depth and texture to the design.  Here’s where you can really let yourself experiment with color and various thread weights.  I particularly liked the look of some variegated 30 wt. thread. 

When I declared the thread painting “done” I got out my beads and went to town!  Because this will be used for “show and tell” in class I wanted to be sure to incorporate several basic beading stitches.  I used moss stitch, scatter stitch, seed stitch, bugle pathways, back stitch and stacked stitch.  

My goal was to achieve a vibrant mix of color, texture and bling.

Call Baron’s today to sign up – This is a FUN class.

818-224-2746

Accessories and Ornaments, Art Quilts, Fiber Art, Home Dec, Workshops

Paint and Bead Your Own Decorative Pillow

Back By Popular Demand

Make your own decorative pillow.  You will paint your own fabric and embellish it with stitching and beads.  The class is on the schedule at Baron’s Sewing Center in Woodland Hills for Tuesdays November 12th and November 19th  
 6 pm until 9 pm 
(6 Hours total – 3 hours each day)

You can create your own design or fashion your pillow along the lines of this one that I made for this class.

P1040166

I started with a piece of white PFD Kona cotton and painted the background with an acrylic wash of color.  Next I painted the flowers and layered the piece with batting and lining.  Then the REAL fun began as I used thread painting to add depth and texture to the design.  Here’s where you can really let yourself experiment with color and various thread weights.  I particularly liked the look of some variegated 30 wt. thread. 

When I declared the thread painting “done” I got out my beads and went to town!  Because this will be used for “show and tell” in class I wanted to be sure to incorporate several basic beading stitches.  I used moss stitch, scatter stitch, seed stitch, bugle pathways, back stitch and stacked stitch.  

My goal was to achieve a vibrant mix of color, texture and bling.

Call Baron’s today to sign up – This is a FUN class.

818-224-2746

Accessories and Ornaments, Art, Home Dec

Paint and Bead Your Own Decorative Pillow ! Back By Demand Jan. 14, 2014

I’ve been busy preparing for what is shaping up to be an exciting Fall schedule of teaching.  One of the new workshops planned is to make your own decorative pillow.  You will paint your own fabric and embellish it with beads.  The class is on the schedule at Baron’s Sewing Center in Woodland Hills for September 24th and October 8th, 2013.

Here is the one that I finished the other day.

P1040166

I started with a piece of white PFD Kona cotton and painted the background with an acrylic wash of color.  Next I painted the flowers and layered the piece with batting and lining.  Then the REAL fun began as I used thread painting to add depth and texture to the design.  Here’s where you can really let yourself experiment with color and various thread weights.  I particularly liked the look of some variegated 30 wt. thread. 

When I declared the thread painting “done” I got out my beads and went to town!  Because this will be used for “show and tell” in class I wanted to be sure to incorporate several basic beading stitches.  I used moss stitch, scatter stitch, seed stitch, bugle pathways, back stitch and stacked stitch.  

My goal was to achieve a vibrant mix of color, texture and bling.  Did I achieve it??

Accessories and Ornaments, bracelets, earrings, Jewelry, Life

Monday is try something new day – in this case a soldering iron

Heya blogees, I’m about to open the package and get out my new soldering iron.  These here are just a bit of delaying tactics in case you didn’t realize.  I’ve never used one of these contraptions but have been busily scouring the google and the youtube 🙂  to do my research.

All that I want to do is to solder a few jump rings.  I usually don’t have a problem getting them to stay put (and the earring or whatever to stay together) but every once in awhile there’s a wayward badass among ’em.

So, wish me luck and I’ll let you know how my experiments worked (or not as the case may be, lol)

Have a wonderful week y’all!

Guila

Accessories and Ornaments, earrings, Jewelry

Back to Beads

We just got back from a few days in San Francisco and I’m loving being back in the “studio”.  Most of all I love playing with fabric, fibers, paint and so on but for the past couple of days I’ve turned my attention to BEADS!!!  My inventory of hand crafted earrings needs replenishing (yes!) and I’m just in the mood to design away!   I made about a dozen over the last couple of evenings and as soon as I’ve finished taking all the pictures I’ll have them posted on Etsy and now on Bonanza too (I’ll post the link as soon as the inventory is in place.)

In the meantime here’s a preview for you.  Let me know if anything in particular strikes your fancy.

Art Quilt, Fiber Art, Quilts, Tutorials

Fish Out of Water

When I posted here several months ago I mentioned that I was working on a piece that needed some hand embroidery to be added.  This was a fun project – something different and incorporating several different techniques.

Here is a photo of  my Fish Out Of Water

And here is an overview of how I made him.

I collaged several fabrics onto a mottled yellow background.  I made a stencil from a fish drawing and when I cut it out I was careful to keep the remaining stencil material intact so that I could use it too.
Then I painted the fish image onto the quilt using the stencil and acrylic paint.  When it was dry I thought that more contrast was needed around the fish so I used the “fish” part of the stencil and painted around the outline.

I outlined the collage pieces with perle cotton and added embroidery to the fish.  Then I added some beads and a button eye to accent the fish.

Outline Stitching and Button Eye
Beaded Tail

Finally I stitched and beaded a spray of coral.

Beaded Spray of Coral

I used a pillowcase type of backing and accented the edges with a perle cotton running stitch.

Art Quilt, Fiber Art, Haiku, Life, Poetry, Poetry and Photography

Haiku Art – from February 2011 Faultlines of the Heart

February has rolled around once more.  This year our Haiku prompt word is ‘moon.’  When I get back to the Valley I’ll work on the challenge, writing my haiku based on the prompt and completing a piece of artwork to represent it.  In the meantime I’m jotting down some ideas – a stream of consciousness series of associations for the word ‘moon’.

Last year the February prompt word was  ‘love.’  With so many new people on board this year I decided to encore the February 2011 haiku and art work. The piece was and is one of my favorites.  My goal for the artwork was to illustrate feelings resulting from the loss of love and the subsequent attempts to hide emotions from others.


Here you have a heart that has been fractured into many pieces along the faultlines that were there all along.  And floating over the pieces of the heart are a tangle of ribbons attempting to hide the tears underneath.
letting go of love
hot salty tears flow freely
bruised battered heart cracks.

All the red “shards” combine to form one complete heart. The pieces have been attached to the background with a lot of heavy quilting. I used heavy cotton plus metallic. The ribbons are hand tacked. Under the ribbons are tear-shaped beads peeking out. I purposefully left the thread tails and frayed edges alone as they are part of the over all feeling that I wanted to generate.

Art, Art Quilts, Fiber Art, Mixed Media, Quilts

In Her Element

This was such a fun quilt to make. It contains so many different techniques and required so many design decisions that I thought it would be a good one to blog on.

I started this quilt in a workshop about using Lutradur. We did several kinds of painting on Lutradur and incorporated some stamping. I had a piece that I painted in shades of blue Lumiere – thinking ahead to using the finished product in an art quilt with an underwater theme.

I was in MY element being able to conjure up a variety of embellishments to use on this piece.

My favorite is the kelp. I used a pipe cleaner (aka fuzzy wuzzy wire) as the base and wound some yarn from my knitting leftover bag around it. Then I was able to bend the piece the way I wanted it and couched it to the background.

The dark purple fish was made ‘offline’ with some underfabric, netting and a lot of thread painting, then attached to give a slightly 3D look.

The coral was a lot of fun to make. First I painted some lutradur and created the coral shapes with a heat tool. I just burned away to get the shapes that I wanted then stitched them down.

A variety of threads were used in the quilting including my favorite bling thread – #30 Madeira .


All the beading was done by hand.

I finished the quilt with a traditional hand stitched binding.