Make your own decorative pillow. You will paint your own fabric and embellish it with stitching and beads. The class is on the schedule at Baron’s Sewing Center in Woodland Hills for Tuesdays November 12th and November 19th
6 pm until 9 pm
(6 Hours total – 3 hours each day)
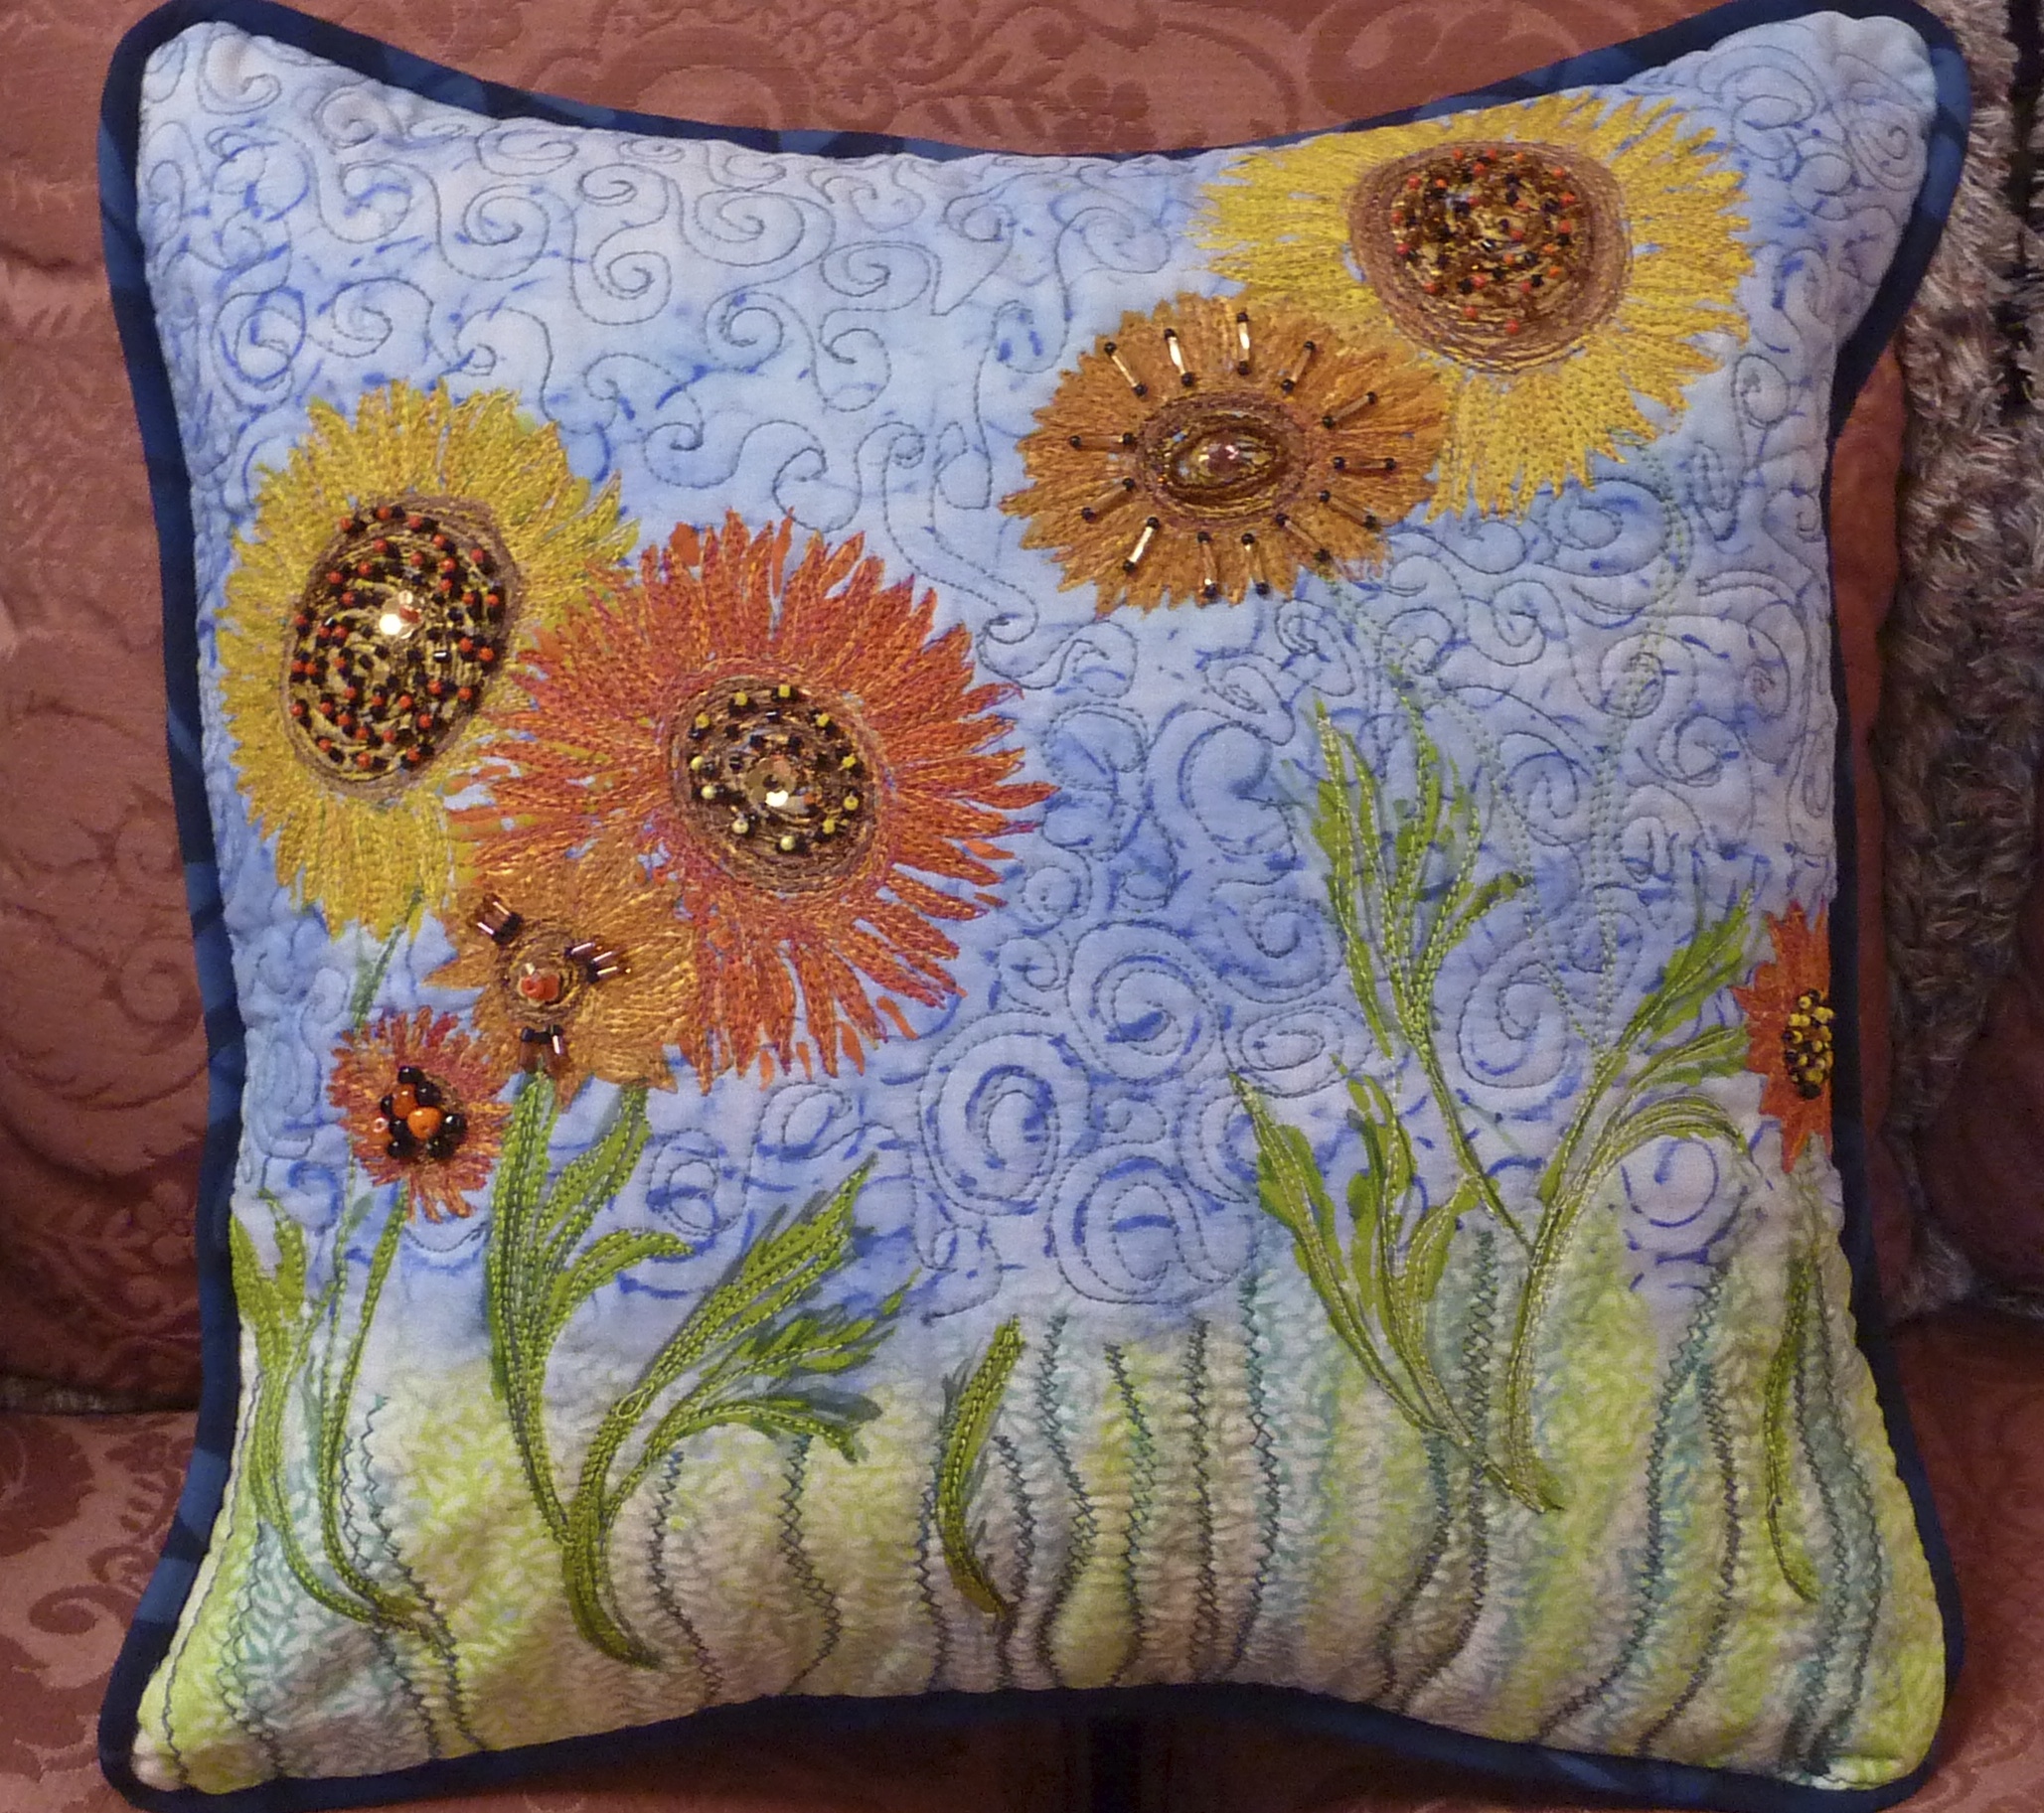
You can create your own design or fashion your pillow along the lines of this one that I made for this class.
I started with a piece of white PFD Kona cotton and painted the background with an acrylic wash of color. Next I painted the flowers and layered the piece with batting and lining. Then the REAL fun began as I used thread painting to add depth and texture to the design. Here’s where you can really let yourself experiment with color and various thread weights. I particularly liked the look of some variegated 30 wt. thread.
When I declared the thread painting “done” I got out my beads and went to town! Because this will be used for “show and tell” in class I wanted to be sure to incorporate several basic beading stitches. I used moss stitch, scatter stitch, seed stitch, bugle pathways, back stitch and stacked stitch.
My goal was to achieve a vibrant mix of color, texture and bling.
Call Baron’s today to sign up – This is a FUN class.
We just dropped off 2 embellished journal covers at Baron’s. “How to create an embellished/collaged fabric journal cover” Workshop is scheduled for Saturday March 16 and repeated Tuesday March 19. Call Baron’s to register or for details.
This cover fits a composition book approximately 9 inches high by 7 1/2 inches wide.
Collaged Fabric Journal Cover
This is the size we will be making in class. We will provide the composition books in the purchased supply kit.
This cover was adapted to fit a spiral bound art journal measuring approximately 5 1/2 inches by 8 inches. We will provide guidelines for adapting directions for other sizes.
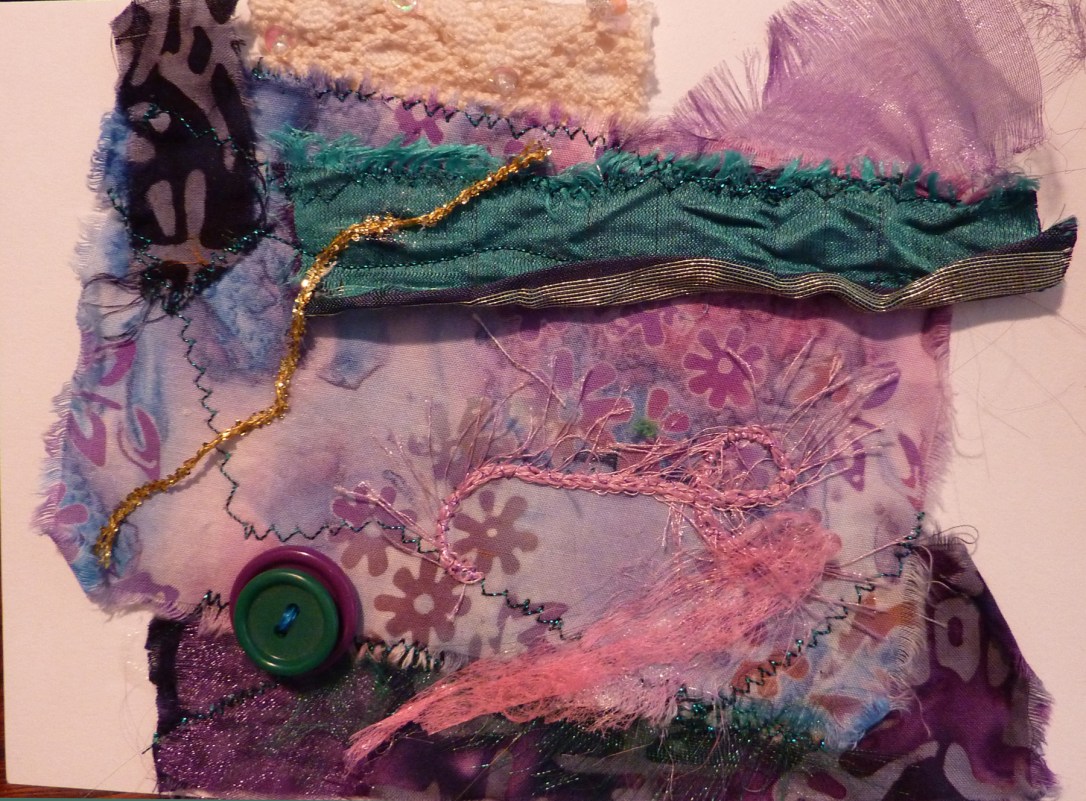
As the year is winding down I’m busy getting my act ready to take on the road for 2013. A new workshop being offered is Celebration Art Cards.
This is one of my favorite things – creating small mixed media pieces – combining colors and textures as I go to achieve a special look. It’s all about color – movement – mood – and most of all letting those creative forces loose and having FUN!!
Here is a preview:
Workshop being offered at Baron’s Sewing Center Friday January 18: 4 PM until 7 PM.
In addition – I will be demo-ing this technique at the San Fernando Valley Quilt Association’s annual Quilt College, Monday February 18, 2013
Topics in Art Quilting Techniques will continue into the New Year. For those who missed them the first time around we are repeating key topics such as Painting on Fabric, Putting on the Glitz and so on.
For those of you who are eager to delve further into Art Quilting Techniques we will be scheduling additional classes such as Using Alternative Materials in Your Art Quilts, Orphan Blocks as an Inspiration for Art Quilting and more!
I CAN tell you that the first scheduled workshop of 2013 will be Tuesday January 15 from 6 PM until 9 PM. It will be Painting on Fabric. You will learn how to select and prepare your fabric; how to select appropriate paint for your project and how to apply the paint. You will learn techniques for stenciling and stamping with paint as well as how to apply paint with a brush to achieve the effect you are looking for. Make sure you wear clothes that won’t suffer if they receive some paint splashes or bring a coverup. It’s going to be a fun and creative evening.
I expect to have the rest of the dates for the first quarter firmed up later this week so keep your eye on this space.
And enjoy your Thanksgiving Day with lots of good food and surrounded by family and friends!
Finally! I’ve created a stand alone page that is devoted to Class Descriptions. On the page now is a list of classes that have been scheduled between now and the end of the year. Next, I will add additional workshop descriptions for classes that I teach but are not currently scheduled.
Just look to the headings across the top of my blog and click on Workshops to see it all. And ***MOST IMPORTANT – I am asking for feedback.
WHAT ART QUILTING RELATED CLASS TOPICS ARE YOU INTERESTED IN? Please let me know as we plan our future workshops.
One of the most gratifying things as a teacher is that moment when your students’ eyes light up and you can see their creative juices churning.
Well that was a moment repeated many times over the past few weeks as a group of eager sewers and quilters attended our Art Quilt Intro Series.
This was an introductory series of 3 sessions at Baron’s Sewing Center in Woodland Hills. A fourth informal class is planned this week so that the participants can put the final touches on their creations with the instructors on hand for assistance.
Art quilting encompasses a vast number and variety of techniques that are both fun to learn and valuable tools to have when planning a new piece. With limited time available it was a daunting task to select only a few of them. We did so with emphasis on straightforward versatile techniques. We also presented methods that were fun to do and that used products that wouldn’t be too difficult to find. The focus was on technique but each participant was encouraged to put together a piece that would incorporate these newly learned skills.
Guila Discussing Use of Discharge PasteBetsy Demo-ing Use of Rubbing Plate with Shiva Paintstiks
Session one
We focused on preparing backgrounds; either as a first layer for additional embellishments or to serve as the composition itself.
We introduced a variety of ways to get paint onto your quilt: using fluid acrylic paints and solid oil sticks, the group practiced applications using rubbings, stencils and stamps.
We also discussed and demonstrated Discharge Techniques- various ways of removing color from fabric. These included household bleach and discharge pastes – plain and with color added.
When we got to the “hands on” part of the class, they all took off like a shot – full of enthusiasm and creative ideas It’s unusual to see an entire group just take off and run with their new knowledge the way these women did. We all had a blast.
Practicing with paint and stencils, stampsPeggy Making Art
Session Two
We turned our attention to preparing the quilts for quilting. A very important part occurs before your first stitch and we introduced the topic of thread selection, determining function and style and so on. During this session we also started our discussion of embellishment techniques. We focused on fusible appliqué and methods of securing these design elements. The students also learned how to use foil as a highlighting embellishment – using glue, fusible sheets or a powdered fusible called BoNash to transfer the foil to the fabric surface.
A lot of additional designing went on during the week 2 workshop and both Betsy and I worked closely one on one with the students to help them through their design decisions and implementation.
Busy at Work on Their Quilts
Session Three
Time to add a little glitz and glamor to our art quilts. We discussed beautiful sparkly Angelina – how to use it, stamp it, apply it to the quilt surface and much more. Wow, exciting stuff to stir up your imagination!
Hey, Look What I Just Made!Angelina Wings
We also talked about and demo’d the use of glitter in your quilt. Talk about your sparkle opportunity.
Suzanne’s Sparkly Key
The little art quilts, well under way, needed to eventually be finished. So we went over various ways to finish the ‘edges’ of the quilts and various methods of applying the ‘false’ back to the quilt.
During these classes the quilting and embellishments were done with the following quilt layers in place: top, stabilizer, batting, muslin. Then, later a more pleasing/interesting fabric backing was added.
We will be putting the final touches on the quilts this next Wednesday morning.
**And we are all looking forward to diving further into the art quilting world this summer. The highly anticipated Art Quilt Camp for Quilters will be held from July 16 through July 20 from 10 AM until 5 PM each day. Sign up now to reserve your spot!
Monday evening arrived and we gathered around the classroom tables at Baron’s Sewing Center in Woodland Hills. We were all there for an eagerly awaited kickoff to a series of workshops in Art Quilting. (The next workshops – a series of 3 – begins Wednesday April 25th 10 AM until 1 PM for 3 weeks)
My co-conspirator (Betsy Farwell) and I had all our props lined up and plenty of information to share with this budding group of quilt artists.
Several of the assembled had never been involved in art quilting at all. Our goal was to introduce them to some of the basic concepts and techniques of art quilting. Traditional quilting is filled with ‘rules’ and exact measurements. Art quilting is all about creativity and throwing away the rulebook.
Several participants were a little anxious because they didn’t consider themselves to be “artists”. We aimed to get across the idea that there are many ways to be an artist – that being able to draw well is a great skill to have but it is only one of many. The first prerequisite to being an art quilter is a willingness to experiment and to let your creative mode loose. It is not even necessary to have quilting experience. Many art quilters came to the field from general art backgrounds; some jumped immediately to art quilting after just a brief intro to quilting.
Our major task was to decide which of the many techniques of dozens and dozens to highlight and to demonstrate. We ended up with a smattering of surface design techniques such as fabric painting with Shiva paintstiks and Acrylic paint and use of rubbing plates, stencils and stamps. We also introduced the group to various methods of fabric discharge.
To add a little glitz and glamor we demonstrated use of foil and Angelina embellishment. We had available a potpourri of fun tidbits that they could use as they wished on their creations.
There was limited time for the group to play and try out all these techniques. But we turned them loose and play they did! To save time we provided some of our own teapot patterns. It was so much fun to see the group go off in their own directions to create their unique quilts. And here is some of their work in progress.